Night photography has an attraction all its own. There's something about scintillating lights from office windows hanging in the dark of the night -- a modern version of the starry skies -- that appeal to us. Whether it's a city skyline, lamp posts on a dark and deserted street, or the front of your house all decked out with holiday lights, the challenge of capturing the mood of a night scene depends on whether your digital camera is capable of night photography and on a couple of simple techniques.
Can My Camera Do Night Photography?
For successful night photography you need a digital camera that allows you to keep the shutter open for a long time, anywhere from 3 to 30 seconds. Check your camera specifications in the User's Manual under Shutter Speed. The shutter speeds available will be given as a range, e.g. 30 sec. - 1/2,000 sec.
If you are seriously into night photography, then you would want to ensure you purchase a digital camera that allows the longest shutter speed possible, and even Bulb (where the shutter remains open as long as you depress the shutter release button).
But before you plunk down your money for that digital camera, there's two more features to verify -- and one accessory to purchase, if you don't have it already.
Shooting Modes
For an image to be captured by a digital camera's image sensor, the latter requires exposure to light. But at night, light is what we don't have enough of.
Some of you may have noticed that, if you select a shooting mode of Auto (A) or Program Auto (P), your night pictures always come out too dark. They are simply underexposed. But, why is that -- if your camera's shutter speed ranges from, say 10 sec. to 1/2,000 sec.?
Go back to your camera's User's Manual and look a bit more carefully. Are all the shutter speeds available in Auto or P mode? Ah-ha, many digital cameras (we're talking consumer models here) do not make the whole shutter speed range available in A and P mode! Perhaps the slowest shutter speed available in A and P mode is only as slow as 1/3 sec. That's usually not long enough for night photography. To access the longer shutter speeds, you may need to select one of the other shooting modes, e.g. Shutter-Priority, or even switch to full Manual mode.
So ensure that your digital camera has full Manual mode and allows access to the full range of slow shutter speeds in that mode.
Self-Timer & Remote Controller
Another feature that you want your digital camera to have is a self-timer or, ideally, a remote controller. The purpose is to allow you to depress the shutter release button without introducing camera shake. I particularly like the remote controller, but not every camera comes with one or even has one available optionally.
But almost all, if not all, cameras has a self-timer. Usually the self-timer counts down from 10 sec. I find that a bit long to wait, especially since you would need to take more than one shot and it's minus 10 with the wind chill outside. The cameras that additionally provide a 2 sec. self-timer have my nod of approval here.
Tripod
A mandatory accessory that you need is a sturdy tripod. When you let the shutter stay open for a long time, the camera needs to be kept rock steady, otherwise you end up with blurred images.
Examples
OK, so we have our digital camera and tripod, and are ready to venture forth into the night in search for interesting night shots. When we find one, we set up camera and tripod, frame and... what do we do now?
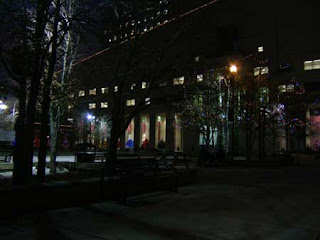
Well, the images below show what happens when you take the same shot using P mode, then in Manual mode with various different shutter speed/aperture combinations, all in search of the correct exposure. The camera was on a tripod for all three shots.
| Programmed Auto Mode - Underexposed |
 |
Fujifilm FinePix E550
7.2mm, Programmed Auto, Pattern
Shutter Speed 1/4 sec., Aperture F2.8, ISO 80 |
In the above example, the camera uses the slowest shutter speed and largest aperture available in P mode and at the widest focal length. The picture is underexposed.
| Manual Mode - Overexposed |
 |
Fujifilm FinePix E550
7.2mm, Manual, Pattern
Shutter Speed 3 sec., Aperture F2.8, ISO 80 |
Switching to Manual mode allows me to access the slowest shutter speed available on this camera, 3 sec. while keeping the aperture at F2.8 (the largest aperture available). The effect is immediately better, but it does seem a bit too bright, giving almost a daylight effect. If this is the effect you're after, then you're done. But if you wanted to capture the night mood, read on.
Now it is just a matter of adjusting the shutter speed and/or aperture to obtain the desired exposure. I choose to close down the aperture so as to increase the depth of field also.
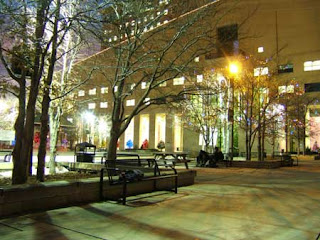
| Manual Mode - Correct Exposure |
 |
Fujifilm FinePix E550
7.2mm, Manual, Pattern
Shutter Speed 3 sec., Aperture F4.0, ISO 80 |
Closing down the aperture to F4.0, a more pleasant image is obtained with enough dark areas to indicate it is night time (dusk, really) and enough lighted areas to reproduce what my eyes saw at the outdoors skating rink at the Mississauga Civic Center.
ISO
For the three pictures above, I used ISO 80, the lowest ISO available for best image quality. But what if at 3 sec. and F2.8 (i.e. at max. exposure possible for this particular camera), the image still came out too dark? In this case, I would need to increase the sensitivity of the image sensor to a higher ISO. Do note that increasing the ISO also increases the amount of noise visible in your images.
Technique
Take a number of shots at different shutter speed/aperture combinations.
Immediately review the shot as soon as you've taken it.
Ensure your LCD brightness is set to Normal, not Bright, for a truer representation of your recorded image.
A good aperture to start with is F4.0 or F5.6 (for greatest depth of field), and adjust shutter speed up or down until you're satisfied with the shot.
For good measure, take an extra shot past your optimum exposure setting. For example, if you were progressively using longer shutter speeds, and you think you've find the correct one, take an extra shot with the next longer shutter speed. Conversely, if you were using progressively faster shutter speeds, take an extra shot using the next faster shutter speed.
We hope you have enjoyed this tutorial.


 Personal photography has gone through a sort of mini evolution in the past 20 years as digital cameras have become popular. With the ability to take huge numbers of pictures, save them on computer, and share them over the internet, the cost of film and developing are no longer limiting factors. Although group photographs, portraits, celebrations, and vacations are still common images, personal photography now captures more impromptu and daily types of events. Photographs of fast moving action are more common as well as people are able to experiment to obtain the type of images they want without fear of "ruining" a shot that requires more skill to take. Capturing action can be challenging for a beginning photographer and requires quite a bit of practice to master. The following outlines a few pointers that can get the novice started off on the right foot.
 3. Follow the action; this is known as "panning". Panning involves tracking the motion of the subject horizontally to capture the movement as it goes side to side. As the photographer moves in the same direction as the motion, a slower shutter speed is often used to allow the subject to be focused and the background to blur demonstrating the action that is occurring. Panning is not necessary for all action shots but is one method of demonstrating the movement while keeping the subject in focus. The process of panning involves the following:
 You might wonder why there is not just a constant shutter speed or a constant aperture so that you would only have to worry about one control. The reason is that even though they both control the amount of light getting to the sensor they also control other aspects of the picture. Shutter speed for example can be used to freeze subjects in midair with a fast speed or it can be used to blur water with a slow speed. Aperture controls the depth-of-field which is what is in focus in the picture. Aperture can be used to draw attention to one subject (like the flower on the right) by blurring the background with a wide aperture (low f/stop). Aperture can also be used to focus everything in a picture with a narrow aperture (high f/stop). (The photo on the left is with Wide aperture (low f/stop) and corresponding shutter speed).


