Jom Layari TawauClick - Berdiskusi Buletin Aktiviti Karya Bersama mereka!
Powered by sudeek playground

Windows XP Professional SP3 Ultra Edition 2009


Adobe Flash Player 10.0.12.36 ActiveX Control (SO YOU CAN GO STRAIGHT TO YOUTUBE AND PLAY VIDS THERE!
Code65536 FontReg 2.1.1
Microsoft European Union Expansion Font Update 1.2
Microsoft Qfecheck 6.2.29.0
Microsoft Update 7.2.6001.788
MSXML 4.0 SP2 (Includes KB954430 Hotfix)
Last Aspi CODECS (V4.71.2) integrated
Copy To/Move To Context Menu Shell Extension
HashTab 2.1.1
Microsoft Calculator Plus 1.0 (Replaces calc.exe)
Microsoft HighMAT CD Writing Wizard (KB831240)
Microsoft Makecab 6.0.6001.22192 (From Windows Installer 4.5 SDK, doesn't mess up file dates)
Microsoft OpenType Font Properties Extension 2.30
Microsoft Power Calculator PowerToy 1.0
ModifyPE 0.81
Microsoft TweakUI PowerToy 2.10
Unlocker 1.8.7 (so you can chose to unlock and delete protected files if you wish, with right click)
UPX 3.03

Winrar v3.80 Pro integrated in windows kit
All 12 ROYAL windows themes integrated into windows kit (the default is still left for the blue XP theme)

Miscellaneous Tweaks integrated

KB873374 - Microsoft GDI+ Detection Tool Registry Entry
KB890830 - Microsoft Malicious Software Removal Tool 2.5
Windows XP SP3 WBEM Fix

DRIVERS INTEGRATED:

Nvidia Chipset drivers
SMU - version Thursday, August 28, 2008 3:34:52 AM
SMBus - version Thursday, August 28, 2008 3:05:47 AM
SATA IDE - version Tuesday, September 09, 2008 10:24:45 PM
nVIDIA ethernet (lan) drivers
Nvidia video driver - version 71.89 WHQL signed (sorry Nvidia makes new video drivers not supporting old ones, I choosed a middle one,
anyway is better than default windows ones)

(ATI,REALTEK) HDMI Audio (for new ATI Video Cards) - Version 11/12/2008, 5.10.0.5735

Within the iso image, there is a folder called ESSENTIALS, (right click on CD and explore...to access it) containing useful soft you might be considering install after xp finishes...

This XP does not have IE7, WM11, WGA , choose to update yourself if you so desire..

All strange behaviours Micro left hazarduous, were eradicated , I mean virus like behaviours which do not ask permision to run, and by running of their free will make computer run slugish
such as: logging of most used files, serchind madly for lan and lan printers, defragmenting when windows thinks the comp is idle, all default delays were cutted
mercyless, keeping a duplicate of files, stupid warning that you do not have firewall or antivirus on, (Security Center carefully cleaned from the windows), ip connections made in the same time is set to 16.777.000 smile.gif)) the Windows is very well designed so as Micro did not do it, you put your good antivirus and firewall and run faster as never before
Windows shuts down in 4 seconds, has disabled by default (can be reenabled)
automatic updates , system restore, remote and desktop connection, it is very well tuned, TRY FOR YOURSELF AND SEE.
PLEASE ENTER THE "ESSENTIALS" FOLDER AND UPDATE DIRECTx AND Microsoft Visual C++ ...ALSO MIGHT CONSIDER WHAT ELSE YOU MIGHT NEED INSTALLING FROM THERE, YOU HAVE ALMOST EVERYTHING YOU NEED THERE FOR A SAFE AND CLEAN PC
Windows it closes now in about 4 seconds
NO NEED FOR ACTIVATION OR ENTERING ANY SERIAL, SETTINGS ABOUT NETWORKS, COMPUTER NAME..SO ON ARE LEFT OPEN, THERE IS A DEFAULT OPTION BUT LEFT OPENED FOR YOU TO CHANGE IT AS YOU WISH WHEN YOU ARRIVE AT THOSE SETTINGS.

DOWNLOAD:
http://rapidshare.com/files/178769074/WINDOWSXpSP32009ULTRAEDITION.part1.rar
http://rapidshare.com/files/178776756/WINDOWSXpSP32009ULTRAEDITION.part2.rar
http://rapidshare.com/files/178784534/WINDOWSXpSP32009ULTRAEDITION.part3.rar
http://rapidshare.com/files/178791881/WINDOWSXpSP32009ULTRAEDITION.part4.rar
http://rapidshare.com/files/178799692/WINDOWSXpSP32009ULTRAEDITION.part5.rar
http://rapidshare.com/files/178808060/WINDOWSXpSP32009ULTRAEDITION.part6.rar
http://rapidshare.com/files/178815009/WINDOWSXpSP32009ULTRAEDITION.part7.rar

Password          www.sendown.com
read more "Windows XP Professional SP3 Ultra Edition 2009"...

Activate Windows 7 beta 1 with Windows 7 beta Genuine Activation PlusPatcher V5


DOWNLOAD:
http://www.megaupload.com/?d=TRCXTX0E

MIRROR:
http://www.uploadground.com/files/SXVF3330/Windows_7_omarpluto.info.rar
http://www.mediafire.co/?sharekey=8bc5568c06d54345e7c82ed4b8f0c380e04e75f6e8ebb871
http://qooy.com/files/1R2A7CVZ/Windows_7_omarpluto.info.rar
read more "Activate Windows 7 beta 1 with Windows 7 beta Genuine Activation PlusPatcher V5"...

Windows Longhorn Only 2MB ZIPPED


This is an .iso file containing longhorn.Which is zipped to only 2mb (really) you can check yourself.

Data File is Zip, 2 Mb :

Uncompressed 733.7 Mb (DVD)

OS:Windows longhorn

Burn with
Alcohol 120%,
Nero or
use PowerISO

DOWNLOAD:
http://rapidshare.com/files/160995079/2MB.LH.By.MechoDownload.rar
http://w14.easy-share.com/1702009498.html
Pass .rar: TADJ@mechodownload
read more "Windows Longhorn Only 2MB ZIPPED"...

7 Tips for Great Photos in the Dark

Follow these seven helpful tips to improve your night photographs.

Shoot During Dusk

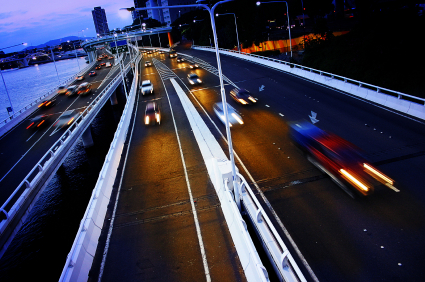
Highway at Night

Some of the best night photos are taken during dusk; when the sky isn't completely black. Taking pictures during dusk will show more colors and details in the distance and will let you use a faster shutter speed.

Use High ISO

Blur vs Noise

Use a high ISO if required. It is better to get recognizable photos of your friends that are grainy than blurry photos. You can reduce noise with image editing software but you can't remove blur.

Keep it Steady

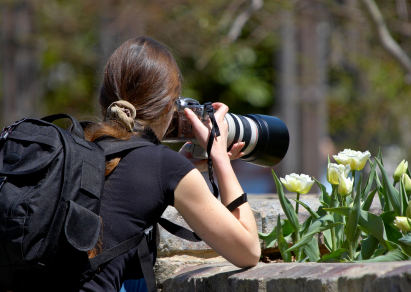
Female Photographer

Taking photos at night requires slow shutter speed. To shoot bright pictures without the blur at night, use a tripod or monopod to keep your camera steady.

In addition to using a tripod or monopod, enable your cameras mirror lockup setting and gently press the shutter. If your camera doesn't have mirror lockup, you can use the self timer mode instead.

If you don't have a tripod or monopod with you, find some support objects to keep your body and arms stable. For example, you can lean on a wall or place your elbows on a table to keep your arms steady. If there's nothing to help keep you steady, stand with your legs far apart from each other and hold your breath while taking the picture.

Motion Blurs

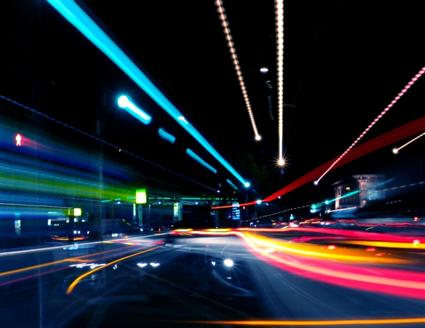
Abstract Motion Blur

Not all blurs are bad. Some blurs such as motion blur can add interest. Try shooting photos of moving objects, or deliberatly move your camera to create a motion blur. Zooming in while the shutter is still open will also add an interesting forward-motion effect.

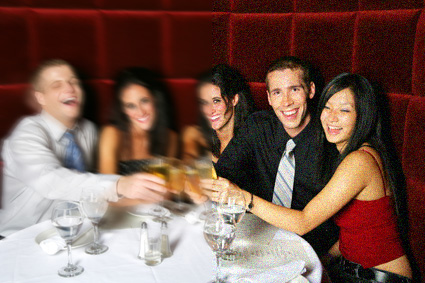
Freeze your Friends

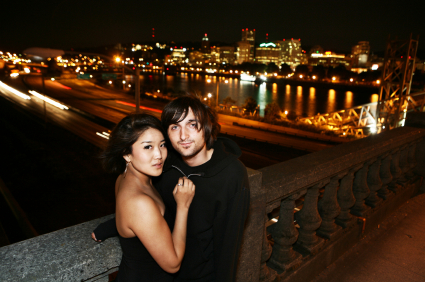
Flash Night Portrait

When taking photos of your friends at night, combine flash with a long exposure. The flash will freeze the foreground and the long exposure will reveal the background. Because people tend to move right after they see the flash, set the shutter curtain sync to the second curtain (Usually in the custom functions settings). This will fire a flash just before the shutter closes instead of in the beginning. Using second curtain sync will also put your friends in front of any motion blur so nothing is covering their faces. Second curtain sync is available in most new digital SLR cameras but rarely seen in point and shoot cameras.

Shoot for High Dynamic Range (HDR)

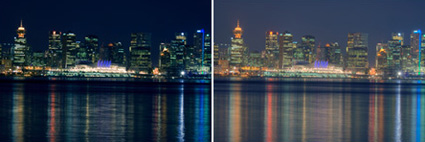
Single Exposure vs Tone Map

Place your camera on a tripod and shoot three exposures: one darker, one lighter, and one just in the middle. Your camera may have auto exposure bracketing to help you with this. Load the images into Photoshop and create HDR file out of the three exposures. Now you have a HDR image that you can apply tone mapping to to reveal more details. Tone mapped night photos can give results similar to shooting during twilight with more post-processing control.

Shoot Several and Stack

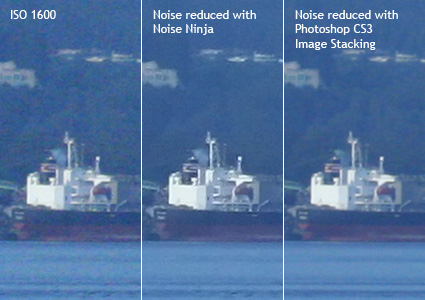
Noise Reduction vs Image Stacking

Sometimes when you shoot long exposures, noise and hot pixels will appear even at the lowest ISO setting. To overcome this problem, shoot the same photo a few times (more is better), and use Photoshop CS3 image stacking to combine the analyze the image to remove noise and hot pixels.

  1. Start Photoshop CS3.
  2. Open the File> Scripts menu and choose Load files into Stack
  3. Click the Browse button and load all the images.
  4. Checkmark the "Create Smart Object after Loading Layers" and click OK.
  5. Open the Layers> Smart Objects> Stack Mode menu and choose Median.
read more "7 Tips for Great Photos in the Dark"...

Create Striking Photos with Good Color Contrast

Many photographers know how to use contrast to benefit their photos. Contrast makes photos eye catching and can even make the most basic looking photos look great. There are two types of contrast:

undefined Tonal contrast
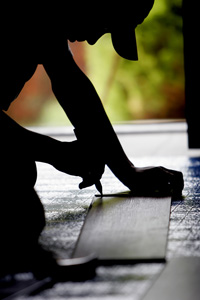
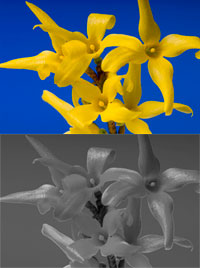
Many excel at shooting photos with good tonal contrast. A good example of tonal contrast are silhouettes. The foreground is completely dark while the background is properly exposed. This works well because there is a sharp difference between the dark and light areas.
undefined Color contrast
Color contrast is used less frequently because many people do not think about it. Capturing a photograph with good color contrast is more difficult than tonal contrast, but it is still quite easy. An image with good color contrast can look great even without any tonal contrast. In the example on the left, the image looks great even with very little tonal contrast.

What can good color contrast do?

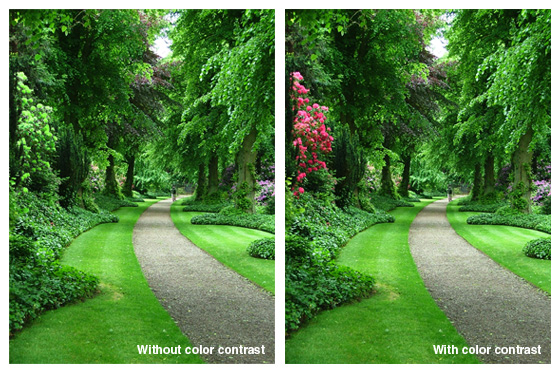
Good color contrast is a good solution when tonal contrast is hard to achieve. Even a tiny area with the opposite hue can make a large difference. Analyze the two photos below. The image on the left looks quite boring, but once we add back the colors of the red flowers, the image looks a lot more interesting.

undefined

How to get the best tonal contrast

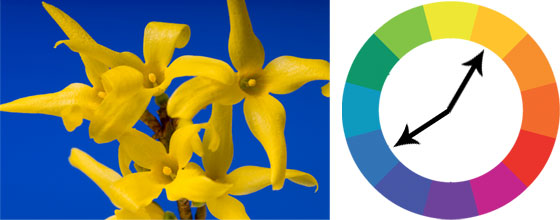
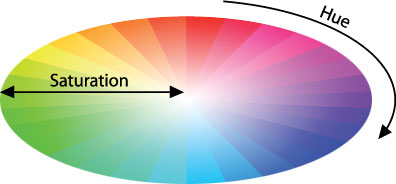
The best tonal contrast contains complementary colors (opposite colors) and high saturation. Two colors on the opposite sides of the color wheel creates contrasting colors. The saturation of the colors affect how prominent it is over tonal contrast.

Contrasting hues

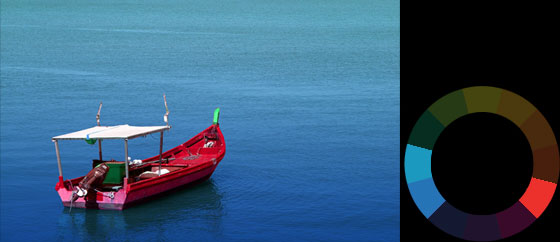
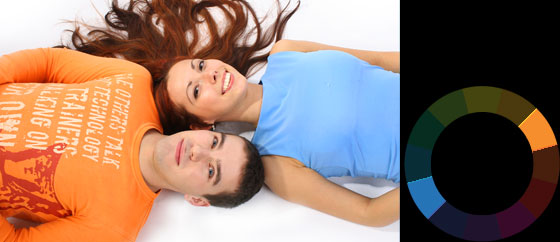
In the image below, the color contrast is good because the colors are almost opposite of each other. The image is loud and grabs attention.

undefined

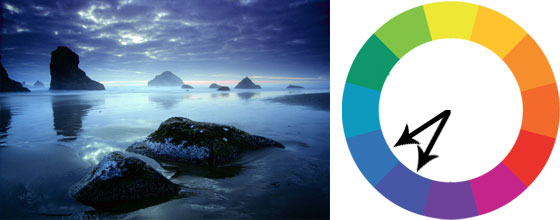
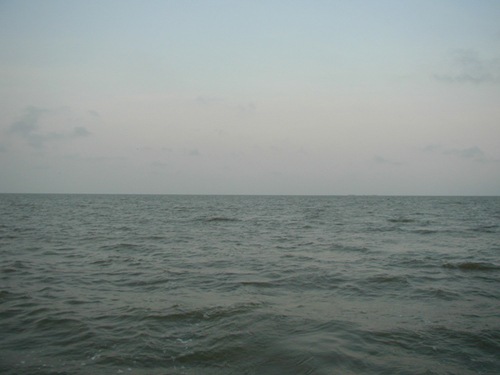
The image below has low color contrast but it still looks great because it has good tonal contrast. Also, low color contrast is not always bad. Low color contrast makes the photo quieter and well for the scenery photo below.

undefined

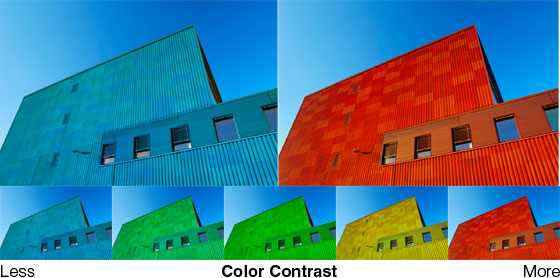
You can make your photos more striking by increasing the color contrast. Below is an example that compares the color contrast. With less color contrast, the image will look dull and quiet. High color contrast makes photos look striking.

undefined

Saturation

The color saturation affects the intensity of the effect. The more vibrant the colors, the more color contrast. A color photograph can be separated into tonal information and color information. When you combine those two, you will end up with a regular color photo.

undefined

How prominent the color contrast is depends on how high the color saturation is. With less saturation, the tonal contrast becomes more noticeable. With more saturation, the color contrast takes over.

undefined

undefined

Simplicity

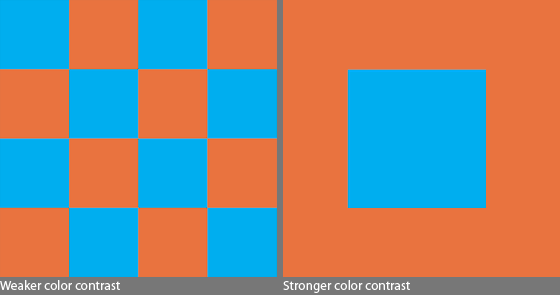
Color contrast also works better with fewer and larger color masses. In the image below, the checkboard pattern has weaker contrast because similar colors are separated and there is an even number of colors (50% orange, 50% cyan). The image on the right has stronger contrast because there are only two areas and more of one color than the other (75% orange, 25% cyan).

undefined

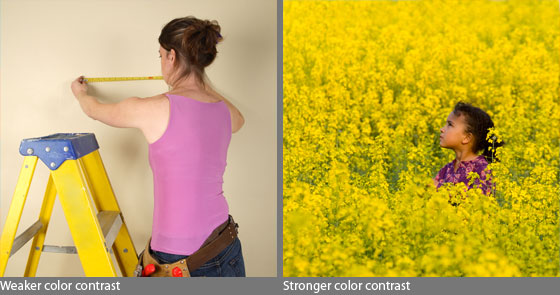
When you introduce other colors into the photo, the color contrast will decrease. Even though yellow and purple are main colors in the left image below, the introduction of other colors (beige, red, and blue), makes the photo less dynamic. The image on the right is an example of good color contrast. There are few colors and more difference in mass between the two complementary colors.

undefined

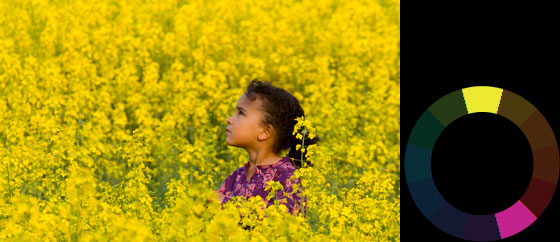
Example photos with strong color contrast

undefined

undefined

undefined

read more "Create Striking Photos with Good Color Contrast"...

8 Tips for Shooting Landscapes with Horizons

Improve your landscape photography skills with these must-know tips for breathtaking landscape photos.

1. Shoot about 30 minutes before and after sunset.

A sunset is a great thing to capture, but even if you’re not shooting the sunset but instead shooting at a 90-degree angle to the sunset or even shooting with the sunset at your back, having that subtle light brings out the colors in landscape photos. Most outdoor photography magazines won’t even consider shots that haven’t been shot around this time, as well as before/after sunrise.

image1

2. Shoot about 30 minutes before and after sunrise.

As well as before and after sunset, shooting before and after sunrise causes a lot of detail and tone to be seen. The lighting avoids being overexposed, which happens many times when shooting in the middle of the day with harsh light. For portraits, you can shoot in the shade for subtle light even during the middle of the day, but with landscapes, you can’t put the entire landscape into the shade. You have to rely on the weather for that. You can shoot a little longer after sunrise if there’s some slight cloud cover, but usually an hour or two after sunrise and it’s already really bright.

image2 OLYMPUS DIGITAL CAMERA

This is an example of a slightly underexposed landscape photo. It’s not shot during the right amount of light, and was shot when the sun was too far down or with too much cloud cover.

3. Have a foreground, middleground, and background.

This is part of the rule of thirds, which I cover in the next tip. Make sure you have three elements in landscape shot in order to make it more aesthetically pleasing. For example, if there are some seagulls running on the beach along the shore, that can be the foreground, while the middleground would be the waves crashing and part of the ocean, and the distant ocean and horizon would be the background.

image3

4. Use the rule of thirds.

The rule of thirds applies to landscape photography as well. Imagine drawing out a tic-tac-toe design, with two lines running vertically and two horizontally. The plane is divided into three equal parts. Try to put the subject where these lines meet; for example, to top left or top right or bottom left or bottom right.

In this photo, the umbrella is in the lower right corner.

image4a

The angles and placement of the two objects near the upper left corner work well here.

5. Use a small aperture.

To include as much as the scenery possible, use a long depth of field. Using a more closed aperture makes the depth of field longer (and the f-stop setting a higher number). This allows for more things to be in focus. While blurring out the background is sometimes preferred, with landscape photos, we often want to have many elements in focus.

image5

In this photo, the camera focuses on the grass, but we want the depth of field to be high so we can see more of the landscape as well.

image5a

This is one example where we can see the detail of even elements far away.

6. Don’t put the horizon in the middle of the shot.

This tip is closely related to the rule of thirds tip: don’t put subjects (the subject being the horizon in this example) in the middle of the shot. While many beginning photographers may be inclined to divide the photo in half, having the horizon the top third, or even top fifth or top eighth, is much better, as is having the horizon in the bottom third, fifth, or eighth. This allows us to focus on either the sky or the ocean or earth so we have some kind of focus.

image6 image6a

7. If the sun is harsh, shoot away from it to get blue skies.

Shooting close to where the sun is causes the areas to be blown out.

image7

This example of the Chinese Theatre in Hollywood shows how areas are blown out when shooting to close to the sun.

8. Finally, keep the horizon level.

This one may seem obvious, and although there are times when the horizon may need to not be level to accommodate a better composition of a subject, keeping the horizon level when possible is good practice.

image8

This is one example where the horizon isn’t level. We’ll fix it in the next part of this article.

read more "8 Tips for Shooting Landscapes with Horizons"...

Windows 7 Build 7100 Public RC X64 Leak


Windows 7 (formerly codenamed Blackcomb and Vienna) is an upcoming version of Microsoft Windows, a series of operating systems produced by Microsoft for use on personal computers, including home and business desktops, laptops, tablet PCs, netbooks and media center PCs.[1] Microsoft has stated that it plans to release Windows 7 to manufacturing in July 2009,[2] with general retail availability set for October 22, 2009,[3] less than three years after the release of its predecessor, Windows Vista. Windows 7's server counterpart, Windows Server 2008 R2, is slated for release at the same time.

FILE DOWNLOAD:
http://rapidshare.com/files/225136093/family_reunion.part01.rar
http://rapidshare.com/files/225136241/family_reunion.part02.rar
http://rapidshare.com/files/225131918/family_reunion.part03.rar
http://rapidshare.com/files/225144762/family_reunion.part04.rar
http://rapidshare.com/files/225146639/family_reunion.part05.rar
http://rapidshare.com/files/225152674/family_reunion.part06.rar
http://rapidshare.com/files/225155890/family_reunion.part07.rar
http://rapidshare.com/files/225161586/family_reunion.part08.rar
http://rapidshare.com/files/225167126/family_reunion.part09.rar
http://rapidshare.com/files/225174263/family_reunion.part10.rar
http://rapidshare.com/files/225173114/family_reunion.part11.rar
http://rapidshare.com/files/225187447/family_reunion.part12.rar
http://rapidshare.com/files/225186652/family_reunion.part13.rar
http://rapidshare.com/files/225185775/family_reunion.part14.rar
http://rapidshare.com/files/225196930/family_reunion.part15.rar
http://rapidshare.com/files/225197684/family_reunion.part16.rar
http://rapidshare.com/files/225201220/family_reunion.part17.rar

pass: wbb
read more "Windows 7 Build 7100 Public RC X64 Leak"...

Windows XP LiveEdition 2


A Bootable Compact Yet Stable Version Of Windows XP Used To Fix Problems. Windows XP Live Rescue Edition 2008 Did you ever want to boot up into Windows XP via a USB or CD? Well, now you can !!! This is a miniature version of Win XP enough to get you up and running so you can restore from backup, access your files, or do whatever you have to do. Instructions inside!

This is what you need :

-Blank CD 700mb
-USB stick with 256 MB capacity. 512 MB Recommended.
-A system that supports booting from Usb stick.

Installation :

-CD-
-Burn ISO to blank CD with NERO or another app

USB STICK
1. Rename USB stick through file HPUSBFW.exe and format with FAT file system.
2. Copy all the files from a folder on USB stick.

Start :

1. Reboot the computer.
2. In BIOS or through Quick-boot menu choose boot from the USB.

SIZE: 51.20 MB | RAR
Download:
RapidShare: Easy Filehosting
read more "Windows XP LiveEdition 2"...

Windows Vista Home Premium sp1 lite


This is the ultra fast version of windows vista home sp1 integraed.Windows Vista Home Premium service pack 1 lite is a great choice for going beyond e-mail and web surfing to improve personal productivity and enjoy all kinds of digital entertainment. You can search for anything on your computer from virtually anywhere, so you’ll save lots of time.This is a Lite version has all the drivers intact for ur devices so no more driver search with lite version. All major features are kept in this version. The activation crack is located in efi folder.

Only 1.2 GB

The removed components are:

Accessories
Accessibility
Games
Snipping Tool
Speech Support
Welcome Center
Language packs removed (English & Arabic only left)
Multimedia
Media Center
Movie and DVD Maker
Music and Video samples
Sample Pictures
BitLocker Drive Encryption
Malicious Software Removal Tool
Manual Install (Setup.exe)
Microsoft Agent
Natural Language
Parental Controls
Performance Counters
Reliability and Performance Monitor
Security Center
Tablet PC
Windows Backup
Windows Defender

DOWNLOAD:
http://depositfiles.com/en/files/8g0jpjyr8
http://depositfiles.com/en/files/l26enmk6s
http://depositfiles.com/en/files/o3wyz01h4
http://depositfiles.com/en/files/b5ifn0c09
http://depositfiles.com/en/files/0rh961jus
http://depositfiles.com/en/files/i52lrsoki
http://depositfiles.com/en/files/aro9rfq5u
http://depositfiles.com/en/files/muye9nh7y
http://depositfiles.com/en/files/tvzzjx2l9
http://depositfiles.com/en/files/2fme6rda0
http://depositfiles.com/en/files/82gem8t8d
read more "Windows Vista Home Premium sp1 lite"...

Download Windows 7 Build 7068 RC1 x86-x64


Windows 7 (formerly codenamed Blackcomb and Vienna) is an upcoming version of Microsoft Windows, a series of operating systems produced by Microsoft for use on personal computers, including home and business desktops, laptops, tablet PCs, netbooks and media center PCs.[1] Microsoft has stated that it plans to release Windows 7 to manufacturing in July 2009,[2] with general retail availability set for October 22, 2009,[3] less than three years after the release of its predecessor, Windows Vista. Windows 7's server counterpart, Windows Server 2008 R2, is slated for release at the same time.

Unlike its predecessor, which introduced a large number of new features, Windows 7 is intended to be a more focused, incremental upgrade to the Windows line, with the goal of being fully compatible with applications and hardware with which Windows Vista is already compatible.[4] Presentations given by the company in 2008 have focused on multi-touch support, a redesigned Windows Shell with a new taskbar, a home networking system called HomeGroup,[5] and performance improvements. Some applications that have been included with prior releases of Microsoft Windows, including Windows Calendar, Windows Mail, Windows Movie Maker, Windows Photo Gallery, will not be included in Windows 7; some will instead be offered separately as part of the freeware Windows Live Essentials suite.

32 bit version 
http
://rapidshare.com/files/214580957/Windows.7.x86.build.7068.part01.rar.html
http://rapidshare.com/files/214581764/Windows.7.x86.build.7068.part02.rar.html
http://rapidshare.com/files/214580998/Windows.7.x86.build.7068.part03.rar.html
http://rapidshare.com/files/214594313/Windows.7.x86.build.7068.part04.rar.html
http://rapidshare.com/files/214581880/Windows.7.x86.build.7068.part05.rar.html
http://rapidshare.com/files/214580950/Windows.7.x86.build.7068.part06.rar.html
http://rapidshare.com/files/214580999/Windows.7.x86.build.7068.part07.rar.html
http://rapidshare.com/files/214581051/Windows.7.x86.build.7068.part08.rar.html
http://rapidshare.com/files/214580983/Windows.7.x86.build.7068.part09.rar.html
http://rapidshare.com/files/214581088/Windows.7.x86.build.7068.part10.rar.html
http://rapidshare.com/files/214581085/Windows.7.x86.build.7068.part11.rar.html
http://rapidshare.com/files/214581506/Windows.7.x86.build.7068.part12.rar.html
http://rapidshare.com/files/214581491/Windows.7.x86.build.7068.part13.rar.html
http://rapidshare.com/files/214581463/Windows.7.x86.build.7068.part14.rar.html
http://rapidshare.com/files/214581430/Windows.7.x86.build.7068.part15.rar.html
http://rapidshare.com/files/214581410/Windows.7.x86.build.7068.part16.rar.html
http://rapidshare.com/files/214590176/Windows.7.x86.build.7068.part17.rar.html
http://rapidshare.com/files/214590211/Windows.7.x86.build.7068.part18.rar.html
http://rapidshare.com/files/214590197/Windows.7.x86.build.7068.part19.rar.html
http://rapidshare.com/files/214590235/Windows.7.x86.build.7068.part20.rar.html
http://rapidshare.com/files/214590314/Windows.7.x86.build.7068.part21.rar.html
http://rapidshare.com/files/214590246/Windows.7.x86.build.7068.part22.rar.html
http://rapidshare.com/files/214590239/Windows.7.x86.build.7068.part23.rar.html
http://rapidshare.com/files/214590324/Windows.7.x86.build.7068.part24.rar.html
http://rapidshare.com/files/214594345/Windows.7.x86.build.7068.part25.rar.html
http://rapidshare.com/files/214594341/Windows.7.x86.build.7068.part26.rar.html
http://rapidshare.com/files/214594438/Windows.7.x86.build.7068.part27.rar.html
http://rapidshare.com/files/214594784/Windows.7.x86.build.7068.part28.rar.html

---------------------------------------------
64 bit version
http
://rapidshare.com/files/214568916/Windows.7.x64.build.7068.part01.rar.html
http://rapidshare.com/files/214568969/Windows.7.x64.build.7068.part02.rar.html
http://rapidshare.com/files/214568997/Windows.7.x64.build.7068.part03.rar.html
http://rapidshare.com/files/214568979/Windows.7.x64.build.7068.part04.rar.html
http://rapidshare.com/files/214568985/Windows.7.x64.build.7068.part05.rar.html
http://rapidshare.com/files/214576447/Windows.7.x64.build.7068.part06.rar.html
http://rapidshare.com/files/214569048/Windows.7.x64.build.7068.part07.rar.html
http://rapidshare.com/files/214569070/Windows.7.x64.build.7068.part08.rar.html
http://rapidshare.com/files/214569102/Windows.7.x64.build.7068.part09.rar.html
http://rapidshare.com/files/214569584/Windows.7.x64.build.7068.part10.rar.html
http://rapidshare.com/files/214569495/Windows.7.x64.build.7068.part11.rar.html
http://rapidshare.com/files/214569564/Windows.7.x64.build.7068.part12.rar.html
http://rapidshare.com/files/214569555/Windows.7.x64.build.7068.part13.rar.html
http://rapidshare.com/files/214569576/Windows.7.x64.build.7068.part14.rar.html
http://rapidshare.com/files/214569550/Windows.7.x64.build.7068.part15.rar.html
http://rapidshare.com/files/214569622/Windows.7.x64.build.7068.part16.rar.html
http://rapidshare.com/files/214576797/Windows.7.x64.build.7068.part17.rar.html
http://rapidshare.com/files/214569578/Windows.7.x64.build.7068.part18.rar.html
http://rapidshare.com/files/214570986/Windows.7.x64.build.7068.part19.rar.html
http://rapidshare.com/files/214571015/Windows.7.x64.build.7068.part20.rar.html
http://rapidshare.com/files/214570993/Windows.7.x64.build.7068.part21.rar.html
http://rapidshare.com/files/214576952/Windows.7.x64.build.7068.part22.rar.html
http://rapidshare.com/files/214571022/Windows.7.x64.build.7068.part23.rar.html
http://rapidshare.com/files/214571214/Windows.7.x64.build.7068.part24.rar.html
http://rapidshare.com/files/214571050/Windows.7.x64.build.7068.part25.rar.html
http://rapidshare.com/files/214571114/Windows.7.x64.build.7068.part26.rar.html
http://rapidshare.com/files/214571159/Windows.7.x64.build.7068.part27.rar.html
http://rapidshare.com/files/214571556/Windows.7.x64.build.7068.part28.rar.html
http://rapidshare.com/files/214571593/Windows.7.x64.build.7068.part29.rar.html
http://rapidshare.com/files/214571644/Windows.7.x64.build.7068.part30.rar.html
http://rapidshare.com/files/214571558/Windows.7.x64.build.7068.part31.rar.html
http://rapidshare.com/files/214571544/Windows.7.x64.build.7068.part32.rar.html
http://rapidshare.com/files/214571609/Windows.7.x64.build.7068.part33.rar.html
http://rapidshare.com/files/214571643/Windows.7.x64.build.7068.part34.rar.html
http://rapidshare.com/files/214571616/Windows.7.x64.build.7068.part35.rar.html


Keys for windows 7 build 7068:
D9RHV-JG8XC-C77H2-3YF6D-RYRJ9
482XP
-6J9WR-4JXT3-VBPP6-FQF4M
RFFTV
-J6K7W-MHBQJ-XYMMJ-Q8DCH
JYDV8
-H8VXG-74RPT-6BJPB-X42V4
7XRCQ
-RPY28-YY9P8-R6HD8-84GH3

Say THANKS on Comment if this link help you :D
read more "Download Windows 7 Build 7068 RC1 x86-x64"...

Photo Manipulation

Learn how to create this photo manipulation by Oliver Cereto. Some of the techniques you will learn in this Photoshop tutorial are how to give a person a cute doll-like face, how to extend backgrounds, and how to apply a moody photo effect.

Stock Photos

These are the images used to create this artwork. You can click on the images below to go to the web page where you can download the images.

Step 1

Begin by opening the photo of the of the model into Photoshop. Because we are giving this image a dark feeling, we’ll use the levels tool to reduce the brightness and increase contrast. Choose Image > Adjustments > Levels and adjust the settings like shown in the image below.

01

Step 2

While increasing the contrast, we also increased the saturation. Choose Image > Adjustments > Hue/Saturation to reduce the saturation.

02

Step 3

Choose Image > Adjustments > Color Balance. With the color balance tool, we’ll reduce the reds and yellows in the image and add a bit of green. Adjust the settings like shown in the image below. This will give it a strange color effect that is slightly similar to the color effect of lomography. This is just a simple first edit on our image and later we’ll add different color and lighting effects.

03

Step 4

Now let’s play now with the powerful liquify filter. Choose Filter > Liquify. In the Liquify window, you’ll find the tools on the left and the settings on the right side.

In the center of the window is the workspace and preview. Working with the liquify tool is like working with clay. Imagine that you are creating a clay figure that you can smudge and distort it in the way that you want. This is how it works, more or less.

I recommend you that you play with this filter some minutes before to start to work. It’s easy to use but you need practice to get realistic results.

Press B to select the bloat tool. The bloat tool will expand the area that you paint. It’s important that use it carefully by clicking little by little in slightly different areas rather than holding the mouse button on one area.

Now select a brush size about 260 and brush over one of the eyes. Use it carefully in the center of it and make it bigger. Do the same for the other eye.

Press W to select the forward warp tool. It’s like a finger that push pixels. This tool is really useful and can help get better results after using the bloat tool. Use it to fix some types of distortions. For example, if the pupil is not a perfect circle after using the bloat tool, you can use the forward warp tool to correct the imperfections to make it a perfect circle.

Keep the liquify window opened.

04

Step 5

Now let’s work on the nose. Press S to select the pucker tool. The pucker tool is the opposite to the bloat tool. The technique we’ll be using with the pucker tool is the same that the previous one but using a smaller brush size (about 190). Use it on the tip of the nose to make it smaller. Switch to the forward warp tool (w) and, using a smaller brush (about 120), push the sides of the nose towards the centre to get a smaller and thinner nose.

05

Step 6

Next step is to use the liquify filter over the mouth of the girl. Select the Pucker Tool (S) with a brush size about 280 and press in the center of her lips. Be subtle, we don’t want to erase her mouth. Then use the Forward Warp Tool to correct and line up correctly her smile, you can make her smile bigger if you press over the corner of her mouth and drag it carefully.

06

Step 7

Because we have done so many modifications to the eyes and nose, her face still looks a little too big. We are going to correct this with the forward warp tool. Select the forward warp tool and push the edge of the face and chin to make her face look slimmer. Use a brush size about 190 for the large areas and a smaller one for the smaller details.

I modify other places like the hair, pushing down it a little and then I retouch the nose, mouth and eyes. Feel free to modify everything to get the best surreal portrait as possible.

Ensure that you don’t distort the areas that you don’t want. This usually happens when you’re using a big brush. In these cases it’s useful to use a mask. Select the freeze mask tool (F) then paint the zones that you don’t want to modify (for example the neck of the model). Once you have painted the mask, you can feel free to edit without worrying about modifying the areas that you don’t want to.

07

Step 8

Click OK to close the liquify tool then select the burn tool. We are going to darken some of the shadows on the face. Change the brush size to about 257 px and the exposure about 25 %

08

Use the burn tool to darken some areas on the hair and nose.

09

Step 9

Now with the same tool and a brush about 60 px and 50% exposure, shape the edge of the eye to make it darker. Try not to leave it too much from the eye line. Then, with a bigger brush add more shadows over the eyes to make it even darker.

10

Step 10

Select now the blur tool (R) with a brush about 60 px and a strength around 71%. Paint over the face and neck to make the skin smoother.

11

Step 11

Now select the healing brush tool and correct the imperfections on the skin. Be sure that you erase the smudged texture created from the Liquify filter (in my sample they’re visible next to the nose).

12

Step 12

Now we’re going to paint the models lips to make it more striking. Create a new layer on the top and select the brush tool (B). Use a small brush (about 30) and select a dark red color. On the newly created layer, paint over the lips with the selected red color. You don’t have to be too careful because we are going to fix this later.

Change the layer mode to Soft Light and the opacity to 62%. Finally use the eraser tool to erase any painted areas that are not on the lips.

13

Step 13

Now select the smudge tool (R) with a small brush (about 8 px) and strength at 80 %. We are going to add some hair. in quick downward motions, smudge on the areas shown in the image below to create the hair. Alternate the size of the brush to get shorter or longer hair. You can quickly change the brush size by pressing the [ and ] keys on your keyboard.

After you created the hair, you’ll notice that the background has been blurred from the smudge tool. We’ll fix this later.

14

Step 14

Choose Image > Canvas Size. Enter 1840 px as the width. We are going to add the background now. Usually you would select the girl and cut and paste her over the background, but we are going to try another technique that can be helpful sometimes.

Select the texture for the background and copy it over our main image. Resize it to cover all the figure and then change the layer mode to Multiply. Now use a layer mask or the eraser tool to delete the area from the model. It’s easy and we don’t have to fight with the complicated hair selection.

Anyway, if you prefer the other way, just use the quick mask mode or lasso tool to select the girl and paste over the background.

15

16

Step 15

Flatten the image. We’re almost done this photo manipulation but let’s try something a little more difficult. We want to make the image bigger and add some elements to the right of the girl. In this step, we’ll show you two methods of doing this.

First method

The first method is to simply duplicate the background texture and place it on the right. Use the levels and color balance tools to blend it with the original texture.

17

Then, position the texture so that the circles match up. Use the eraser tool (E) to erase the edge of this layer. Merge the two layers then use the healing brush tool (J) to correct any mistakes.

18

Second method

The second way it’s copy one of the circles from our background and paste it in the empty background. Repeat this step as much times as you need to cover the background. Use the same technique with the spaces between the circles but copying the green wall.

19

This will be more complicated than previous idea but you will not have brightness and color matching problems.

20

Step 16

Open the hummingbird image into Photoshop and create a selection of the hummingbird. Choose Edit > Copy to copy the selection onto a clipboard.

21

Switch back to the image with the model then choose Edit > Paste to paste the hummingbird into the document. Select the move tool and move the hummingbird next to the models face. To match the contrast of the current image, we’ll use the Levels tool. Choose Image > Adjustments > Levels. Adjust the settings like shown in the image below.

22

Step 17

Select the wings of the hummingbird and then choose Layer > New > Layer Via Copy. With the new layer selected, apply a Motion Blur (Filter > Blur > Motion Blur) with a setting that will blur the wings slightly like shown in the image below.

23

Change the opacity of the current layer to 80% then use the eraser tool with a soft edged brush to delete part of the wing in the original hummingbird. Finally use the blur tool to blur some parts of the hummingbird to make it look like it’s moving.

24

To finish, we’ll refine the edge of the hummingbird. Erase the edges and add gaussian blur filter (Filter > Blur > Gaussian Blur) of 0.5 pixels to the hummingbird layer.

Step 18

Now we just need to add shadows and our personal tone to the image. Select the Burn Tool (O) and burn different areas (ex. next to the girl, in the upper part of the image and in the edges).

25

Step 19

Now let’s go to our upper layer and select Layer > New Adjustments Layer > Levels. Modify the settings like shown in the image below.

26

This will modify all the layers under this new adjustments layer. Let’s add one more; go to Layer > Adjustments Layers > Hue/Saturation and set the saturation to -20.

27

Finally, go again to Layer > Adjustments Layers > Color Balance and modify the colors like shown in the image below.

28

Step 20

Press Shift+Ctrl+Alt+E to create a new merged layer. Apply a gaussian blur filter (Filter > Blur > Gaussian Blur) with 2,5 pixels on the new layer then change the layer mode to Soft Light with about 28% opacity

Preview of Final Results

29

read more "Photo Manipulation"...
sudeek playground